
Strobist 102: Apparent Size Technobabble
In order to demonstrate this, I will be using the Small Angle Formula, which says:
s' = s / d ;
Where s is the actual size, d is the subject-to-flash distance, and s' is the apparent size. While this is typically used for much greater distances (this approximation is rather accurate in astronomy) where measurements can be made in fractions of radians (hence small angle formula, and not small area formula), and is invalid for this experiment, my use of it for this occasion is purely to add structure to the demonstration. Yes, the flash head could be approximated into an angular measure, but for sanity's sake, let's ignore that possibility.
Back to the equation. One will see that if one adds a factor of two (2) to the distance, the apparent size is halved (1/2):
½ * s' = ½ * (s / d) ;
or
½ * s' = s / 2d .
Our sizes will be made up areas representing the flash's exposure area. Size of the subject is irrelevant given a large enough light source; in other words, assume our subject is smaller than our light source.
For simplicity (and generalization), I am going to demonstrate this using only variables. If you need numbers to wrap your head around what's happening, start with any area you want. Just remember that each halving of area cuts your length and width dimension by a factor of √2. (Divide length and width each by √2 at each iteration.)
First step. We will say at one "d" our flash has the same apparent size as our subject, so s' = s / 1; s' = s.
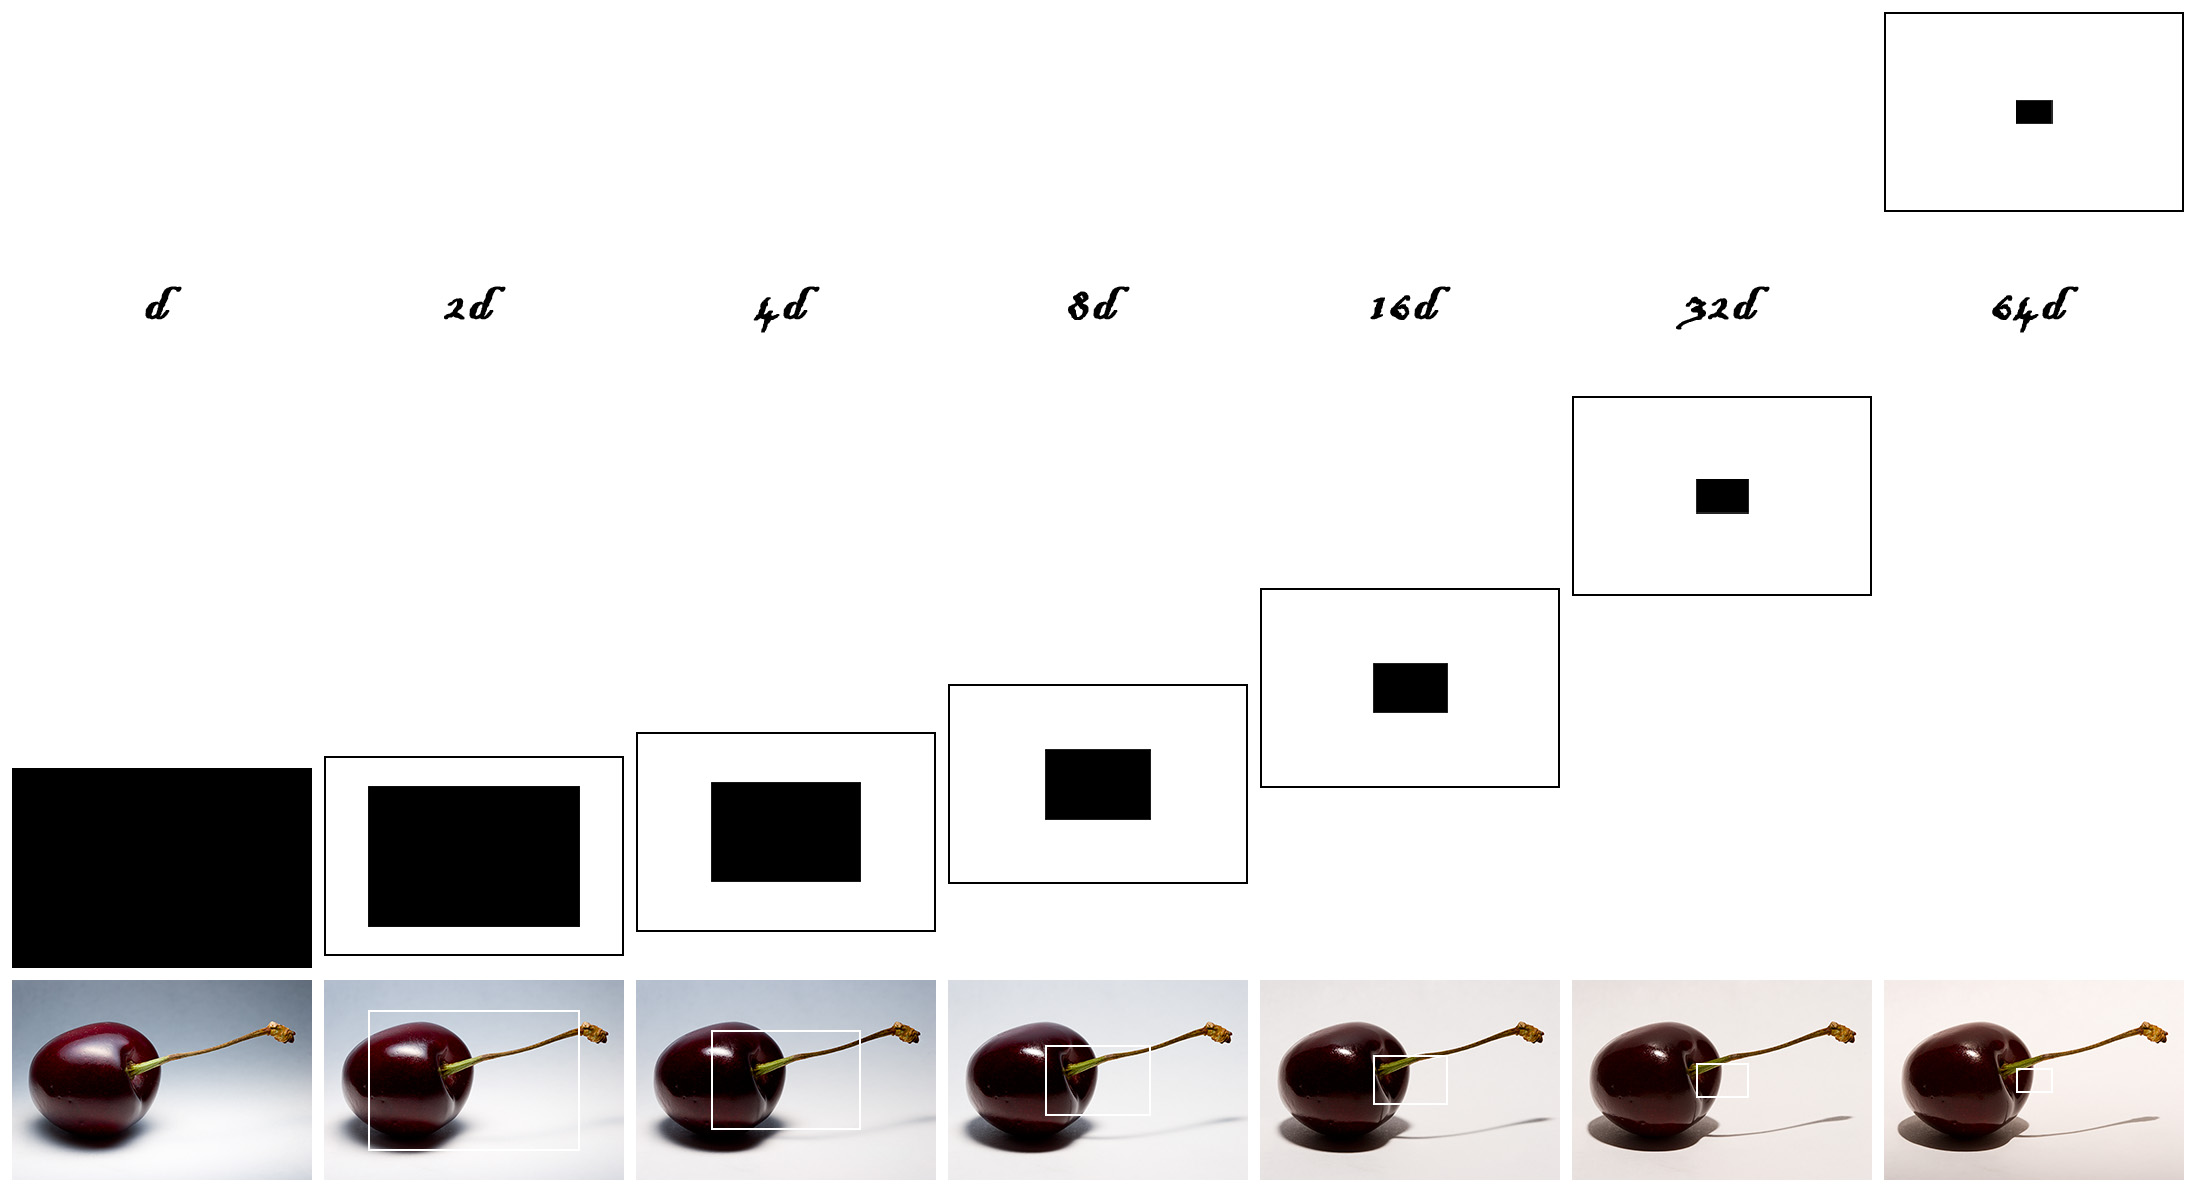
(Click small for large.)
To describe the diagram, the image and black box to the extreme left are the subject and flash area, respectively. Each black outline in the subsequent images are representative of the actual sizes of the subject and flash. The solid black boxes are the apparent size of the flash as seen at the respective distances from the subject. Similarly, the white boxes in the subject images represent the apparent size of the subject to the flash.
There are a couple ways to interpret this, but I will just touch on the subject's view of the light, where apparent flash size is the key player.
Notice in distance d that the flash and subject occupy the same area. This is a very large apparent light source. Coincidentally, it's also very close, so the power needed to illuminate the subject properly is very, very low. (Smaller aperture would be the Lighting 101 equivalent.) This produces large, even, soft areas of diffuse highlights. Due to the intimacy of the light to the subject, there is also a rather large area of diffuse shadow, a penumbra, and a comparatively small umbra. In the same vein, depending on subject shape, the transitional area from highlight to shadow (diffused highlight to shadow transform area) will be a broader gradient with a larger apparent light source, ceteris paribus. At larger values of d, these effects are reversed, because of a greater linearity between the source and the subject.
At a greater distance, the subject "sees" a reduced area of flash. However, we know the flash hasn't actually changed size, rather all the intensity of the light source appears to be coming from a smaller area. Also, since the flash is now farther away, the output must be increased, or the aperture must be opened up. The obvious analogy here is how the sun appears to the earth. The sun is big (yeah, yeah, yeah); it's not small (no, no, no). It's also very bright. However, it's distance reduces the sun to a source emitting parallel rays, leaving earth-bound subjects seeing little penumbra, and harsh, well-defined umbras. The exercise here would be to draw lines from the apparent source to the subject, and view how the lines become increasingly parallel with greater distance.
For more line drawing fun, the rays from a "side" of an apparent light source to an analogous "side" of a subject outline an area defines the umbral area--the area of complete shadow. Rays from one "side" of an apparent light source to the opposite "side" of the subject define the outer edge of the penumbral area--a gradient from complete shadow to, say, ambient levels. To find the diffused highlight to shadow transform area on a contoured subject, cross umbral and penumbral rays.
I hope I explained more than confused with this discussion. If you still need to see more in order to understand some of the points, put down the flash and camera and take a flash light to something round. Move the flashlight closer and farther, and attenuate the beam collimation. Bring a white T-shirt along for a diffuser, or shoot through some paper. That should give you a real-time demonstration of all these points, and then some.
Labels: diffused highlight to shadow transform area, flash, penumbra, photography, small angle formula, Strobist, umbra
posted by Leviathor at
01:15
![]()
![]()

0 Comments:
Post a Comment
<< Home